Hungarian Sampler Part Six: Stamina - completing our Buzsak witchy stitching
It's time to finish the Buzsak witchy stitching section of our sampler blouse!
 We will learn two stitches to do this: the backstitch, and the satin stitch. Be not afraid: the satin stitch is actually much less difficult to master than you would think. And it allows for corrections! Virtually no Hungarian embroiderer satin stitches absolutely perfectly yet their work is usually still quite beautiful.
We left off with all our open chain stitching and fishbone stitching completed, with only the stamina of the tulip, the three little dots on short stems left to embroider. We will now outline the three little stems with a simple backstitch, and cover the dots with satin stitches. So, bring your needle up at the bottom of the V-shape made by the tulip's petals, here:
We will learn two stitches to do this: the backstitch, and the satin stitch. Be not afraid: the satin stitch is actually much less difficult to master than you would think. And it allows for corrections! Virtually no Hungarian embroiderer satin stitches absolutely perfectly yet their work is usually still quite beautiful.
We left off with all our open chain stitching and fishbone stitching completed, with only the stamina of the tulip, the three little dots on short stems left to embroider. We will now outline the three little stems with a simple backstitch, and cover the dots with satin stitches. So, bring your needle up at the bottom of the V-shape made by the tulip's petals, here:
 Then stitch down about 1/8 inch or 2mm ahead, right on the outline:
 Then bring your needle back up again 1/8 inch or 2mm ahead of where you stitched down, again right on the outline:
 This was the beginning of the backstitch, with nothing going backwards just yet. Now take your needle down behind where you just brought it up, right into the endpoint of the previously finished stitch:
 Then bring the needle back up 1/8 inch or 2mm ahead of where your thread ended, like this:
 Now keep doing this - needle down behind where your thread comes out, into the endpoint of the last stitch, and up 1/8 inch or 2mm ahead of your thread:
 And so on, until you get to the end of the stem outline, where you don't bring your needle back up ahead of thread but just complete the stitch you just formed.
Now, we satin-stitch a dot. Bring your needle up again halfway up the circle outline of the little dot connected to the stem you just stitched:
And so on, until you get to the end of the stem outline, where you don't bring your needle back up ahead of thread but just complete the stitch you just formed.
Now, we satin-stitch a dot. Bring your needle up again halfway up the circle outline of the little dot connected to the stem you just stitched:
 Then stitch down right across from where you brought your needle up, halfway up the dot outline on the other side:
 Bring the needle up on the first side, right below where the thread comes out, and by right below I mean maybe one or two of your fabric's threads away from it, then stitch down on the other side, bringing the needle up again on the outline on the other side, a teensy bit down from where your thread comes out:
 And so on:
 Until you get all the way to the bottom of the dot:
 Notice your last satin stitch won't be all that small, it's maybe half as wide as the first one, the outlining here is kind of subtle. Try it, you'll see!
Now, on the back of your embroidery, take your thread through the backs of your satin stitches to the halfway mark again (and you can see what the back of my "witchy stitching" looks like - messier than the front, for sure):
Notice your last satin stitch won't be all that small, it's maybe half as wide as the first one, the outlining here is kind of subtle. Try it, you'll see!
Now, on the back of your embroidery, take your thread through the backs of your satin stitches to the halfway mark again (and you can see what the back of my "witchy stitching" looks like - messier than the front, for sure):
 And bring your needle back up to the front of your embroidery, halfway up the dot outline, it doesn't matter which side:
 Then stitch down on the other side of the outline, bring your needle up to the right side of the embroidery, on the first side of the outline:
 Until you've covered the dot with satin stitches:
 Simple, right? It does take a bit of practice. One thing I'd say is make sure not to pull your stitches too tight. I find that embroidering with a hoop helps with this, even if, like me, you leave your fabric a bit loose so you can more easily embroider with sewing stitches - that is, bring your needle back up to the right side of the embroidery at the same time as you stitched down to the wrong side. But the old ladies who make a lot of everything that's still embroidered in Hungary almost never use hoops... And their stitches have the right tension anyway.
What I did next is complete the little dot on one side of the center dot (starting in the middle, working my way down, taking the thread back to the middle and completing the top half):
Simple, right? It does take a bit of practice. One thing I'd say is make sure not to pull your stitches too tight. I find that embroidering with a hoop helps with this, even if, like me, you leave your fabric a bit loose so you can more easily embroider with sewing stitches - that is, bring your needle back up to the right side of the embroidery at the same time as you stitched down to the wrong side. But the old ladies who make a lot of everything that's still embroidered in Hungary almost never use hoops... And their stitches have the right tension anyway.
What I did next is complete the little dot on one side of the center dot (starting in the middle, working my way down, taking the thread back to the middle and completing the top half):

 Then backstitch over the stem connected to it:
 Then backstitch up the stem to the third dot:
 And finish that dot as well:
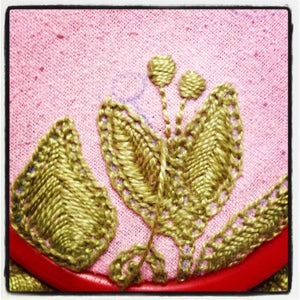
 And there you go! Isn't Buzsak witchy stitching so pretty:
We will learn two stitches to do this: the backstitch, and the satin stitch. Be not afraid: the satin stitch is actually much less difficult to master than you would think. And it allows for corrections! Virtually no Hungarian embroiderer satin stitches absolutely perfectly yet their work is usually still quite beautiful.
We left off with all our open chain stitching and fishbone stitching completed, with only the stamina of the tulip, the three little dots on short stems left to embroider. We will now outline the three little stems with a simple backstitch, and cover the dots with satin stitches. So, bring your needle up at the bottom of the V-shape made by the tulip's petals, here:
Then stitch down about 1/8 inch or 2mm ahead, right on the outline:
Then bring your needle back up again 1/8 inch or 2mm ahead of where you stitched down, again right on the outline:
This was the beginning of the backstitch, with nothing going backwards just yet. Now take your needle down behind where you just brought it up, right into the endpoint of the previously finished stitch:
Then bring the needle back up 1/8 inch or 2mm ahead of where your thread ended, like this:
Now keep doing this - needle down behind where your thread comes out, into the endpoint of the last stitch, and up 1/8 inch or 2mm ahead of your thread:
And so on, until you get to the end of the stem outline, where you don't bring your needle back up ahead of thread but just complete the stitch you just formed.
Now, we satin-stitch a dot. Bring your needle up again halfway up the circle outline of the little dot connected to the stem you just stitched:
Then stitch down right across from where you brought your needle up, halfway up the dot outline on the other side:
Bring the needle up on the first side, right below where the thread comes out, and by right below I mean maybe one or two of your fabric's threads away from it, then stitch down on the other side, bringing the needle up again on the outline on the other side, a teensy bit down from where your thread comes out:
And so on:
Until you get all the way to the bottom of the dot:
Notice your last satin stitch won't be all that small, it's maybe half as wide as the first one, the outlining here is kind of subtle. Try it, you'll see!
Now, on the back of your embroidery, take your thread through the backs of your satin stitches to the halfway mark again (and you can see what the back of my "witchy stitching" looks like - messier than the front, for sure):
And bring your needle back up to the front of your embroidery, halfway up the dot outline, it doesn't matter which side:
Then stitch down on the other side of the outline, bring your needle up to the right side of the embroidery, on the first side of the outline:
Until you've covered the dot with satin stitches:
Simple, right? It does take a bit of practice. One thing I'd say is make sure not to pull your stitches too tight. I find that embroidering with a hoop helps with this, even if, like me, you leave your fabric a bit loose so you can more easily embroider with sewing stitches - that is, bring your needle back up to the right side of the embroidery at the same time as you stitched down to the wrong side. But the old ladies who make a lot of everything that's still embroidered in Hungary almost never use hoops... And their stitches have the right tension anyway.
What I did next is complete the little dot on one side of the center dot (starting in the middle, working my way down, taking the thread back to the middle and completing the top half):
Then backstitch over the stem connected to it:
Then backstitch up the stem to the third dot:
And finish that dot as well:
And there you go! Isn't Buzsak witchy stitching so pretty:
Links to tutorial pages:
- Hungarian Sampler: Main Contents Page
- Hungarian Embroidery Sampler part one: preparations - about threads, needles, hoops, and how to transfer embroidery patterns
- Hungarian Sampler part two: floral motif from Southwestern Hungary - chain stitch, starting and finishing your thread
- Hungarian Sampler part three: Transsylvanian tulips - buttonhole circles, stem stitch
- Hungarian Sampler: administrative update & some additional resources
- Hungarian Sampler part four: witchy stitching from Buzsak - open chain stitch
- Hungarian Sampler part five: filling in the witchy stitching from Buzsak - fishbone filling stitch
- Hungarian Sampler part six: stamina – completing our Buzsak witchy stitching - back stitch, straight satin stitch
- Hungarian Sampler part seven: variations
- Hungarian Sampler part eight: “woolly” stitching from Hungary’s central plains - 'fake' satin stitch
- Hungarian Sampler part nine (the last): Matyó rose from Northern Hungary - oblique or slanted satin stitch
- Blouses to embroider: a great free pattern is the Sorbetto top from Colette Patterns (the version with the plain front). The Róza top would also work great for this project, as well as the Uptown folk blouse.
- Download the Hungarian Sampler embroidery PDF pattern (2 pages, formatted to print on either US Letter or A4 size paper).
- Share your work on Instagram and make sure you tag your pics with #kateandrosepatterns #hungariansampler!