Hungarian Sampler Blouse Part 3: Transsylvanian Tulips
The second section of our sampler is a design made up of three tulips based on the embroidery style of the Hungarian regions of Romania, in Transsylvania:

Most often a very wide and tight open chain stitch is used to outline each shape with or red wool thread on homespun linen cloth. This is called "large-written stitching", like on this pretty little doily:

Or in these examples:

(source)
The insides of the motifs were filled in with a variety of other stitches. You can view more examples here and here. This style of embroidery originates from the elaborate silk cloths noblewomen stitched with expensive gold, silver, silk, or wool threads, most often to decorate their churches. As it passed into villagefolks' hands the original lily and pomagranate motifs of the nobility's embroidery were somewhat simplified, the stitching became more stylized, and the motifs were reinterpreted as flowers familiar to the inhabitants of villages from their daily lives. The tulip shape is especially important as it stands for femininity. If you look at tulip at the center of this motif of our sampler, you can see a kind of almond seed in its center, which symbolizes a fertile womb. The other tulips, however, can be interpreted as something a bit different: the upside-down heart-like shape can stand for male genitals with the tulip, the woman, enclosing it within herself (not kidding... isn't that kind of great?). So, let's get to work! Here are our bare tulips:

Since we barely got started with our sampler, we are going to use the same, plain chain stitch to outline our motifs, then a stem stitch in the center areas of all three tulips, and a button-hole stitch for the round bits at the edges. I began outlining at the bottom of the center tulip:

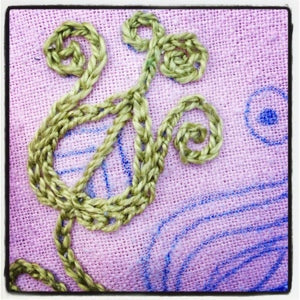
Keep going until you've got a tulip fully outlined, and the center area and spirally pollen tubes, like this:


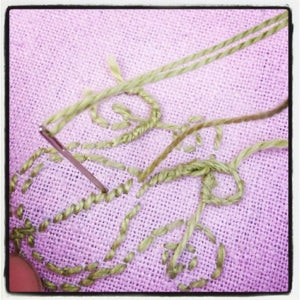
Then, bring your needle up at the bottom mid-point of the center area, very slightly to one side of the marked center line:

Now take your needle down not more than 1/8 (2mm) ahead, very silghtly to the other side of the marked center line as where you began, and bring your needle back up right next to where you started this line of stitching, very slightly to the first side of the center line:

Then make another stitch, about twice as long as this first one, taking your needle down very slightly on one side of the center line, and bringing it back up on the other side, right next to where your first stitch ended:

Now keep going like this - taking your needle down to the wrong side of the embroidery moving ahead, slightly to one side of the center line and bringing it back up halfway behind, slightly to the other side of the center line:


Until you've covered the entire line:
To finish the rest of the "heart", take your thread to the beginning of the little line next to the center line, like this:

And stem-stitch along the line. Do the same with the other shorter lines in this part of the motif, like this:

Repeat on "heart" of the tulip on the other side, and the almond-shaped center of the middle one:

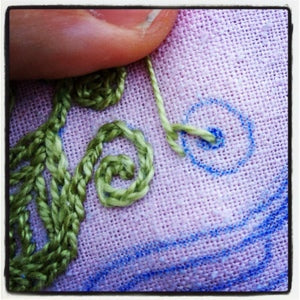
And now the last stitch: decorative circles with buttonholes! I'll start at one of the side tulips, bringing my thread over in back to where the little circle with the dot is marked on the pattern:

Bring the needle up at the edge of the circle:

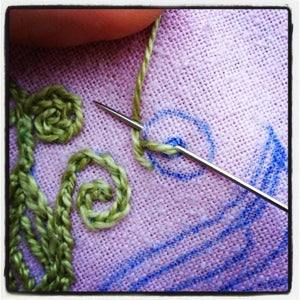
Then stitch down into the center dot and bring the needle back 1/10" (1mm) ahead, catching the thread with the needle:

And making a loop, a bit like in a chain stitch:
Now repeat these steps - needle down in center point and up a bit ahead on the line, catching the thread to make a loop:

Keep going round like this to make the complete buttonhole-circle, stitching down the last loop:

Do the same with the other circles, and you're done! Look how pretty it looks:

And look how pretty our sampler is looking already:

Links to all tutorial pages in the series:
- Hungarian Embroidery Sampler part one: preparations - about threads, needles, hoops, and how to transfer embroidery patterns
- Hungarian Sampler part two: floral motif from Southwestern Hungary - chain stitch, starting and finishing your thread
- Hungarian Sampler part three: Transsylvanian tulips - buttonhole circles, stem stitch
- Hungarian Sampler: administrative update & some additional resources
- Hungarian Sampler part four: witchy stitching from Buzsák - open chain stitch
- Hungarian Sampler part five: filling in the witchy stitching from Buzsák - herringbone filling stitch
- Hungarian Sampler part six: stamina – completing our Buzsák witchy stitching - back stitch, straight satin stitch
- Hungarian Sampler part seven: variations
- Hungarian Sampler part eight: “woolly” stitching from Hungary’s central plains - 'fake' satin stitch
- Hungarian Sampler part nine (the last): Matyó rose from Northern Hungary - oblique or slanted satin stitch
- Blouses to embroider: any blouse with a flat front would work. The Róza top pattern would also work great for this project.
- Download the Hungarian Sampler PDF embroidery pattern (2 pages, formatted to print on either US Letter or A4 size paper).
- Share your work on Instagram and make sure you tag your pics with #kateandrosepatterns #hungariansampler!